Author Topic: Just finished my solar water heater 2 days ago... (Image heavy)  (Read 50027 times)

0 Members and 1 Guest are viewing this topic.

jondecker76

  • Full Member
  • ***
  • Posts: 100
Well after 3 years of working on it, my version of Gary's "$1000 solar water heater"  should get its first bit of sun today, though probably just a few small bits!  I actually finished it on Monday, but its been all rain since, so I'm quite excited to see how it performs today (only supposed to be a partly sunny day today with some rain on and off, but some sun is better than none!)

Here are some notes on this project:
  • Took 3 years to finish. Built the 250 gallon box tank in the basement in 2009. Built the 80 sq.ft serpentine copper collector in 2010 and mounted it to the south side of my house. This year, I ran plumbing, dressed up the outside to look nice, designed and built my own controller board and designed my own programming for an Arduino microcontroller to run things.
  • Approximate cost was somewhere between $2200 and $2500.  This is much more than the $1000 that Gary's design calls for, but keep in mind that mine is also about twice as big and I made a few mistakes along the way that cost some extra money
  • I added a lot of my own personal touches to Gary's design.  I plan on publishing full documentation of my build including schematics and programming for the controller that I designed (when I get time to put it all together)
  • The controller monitors 5 temperatures: Ambient, Panel, Tank, Tank Inlet, and Pump Outlet.  It cost roughly $75 to build, including the temperature sensors (which cost $2 each to make!).  I will be adding Ethernet capability for control and logging in  the near future.  The controller is fully configurable through a menu which lets you adjust the following:
    - Jog the pump
    - Set minimum panel temperature for recirculation (I have it set at 125)
    - Set minimum temperature differential of the panel over the tank (I have it set at 20)
    - Set the maximum tank temperature (i have it set at 160)
    - Set a deadband timer.  (I have it set at 90 seconds). The way the controller works, is it will start recirculation IF A) The tank isn't over its high setpoint AND B) If the panel is above minimum temperature AND C) if the panel is X degrees warmer than the tank as defined by the setpoint.  However, for shutting off the pump,  I directly compare the tank inlet temperature to the pump outlet temperature.  Whenever the water coming in falls below or equal to the water going out, it shuts the pump off. This is why the deadband timer is needed, so it gives the system time to get water up to the panel and coming back into  the box.  After the deadband timer expires, only then will the controller start checking for conditions to shut the pump down.
    - Calibrate each of the 5 temperature sensors
  • - I set up a webcam pointing at the controller if anyone wants to watch temperature data on the controller.  http://linuxmce.homelinux.com:8221  use the "Guest Visit" option (I have it set up so I don't have to constantly run down to the basement today, but feel free to take a peek (though I'm not sure what kind of frame rate you'll get or how many simultaneous users it will handle)


Now for a few pictures!
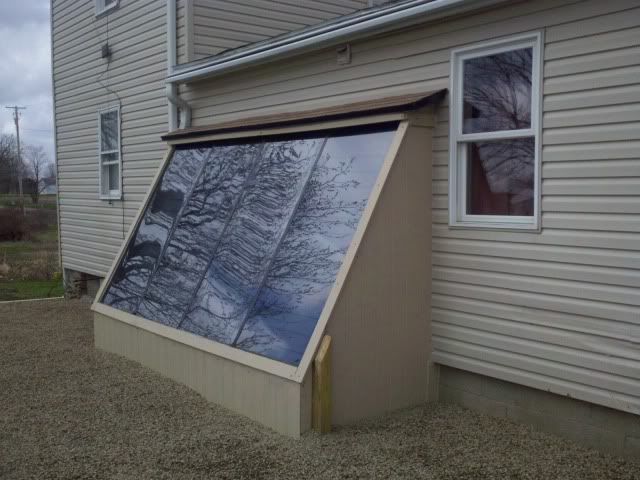

I took this right after finishing the process of making the panel a little more appealing to look at. It has a small shingled roof that matches the pitch of the house's roofline.  Also, this area used to be a bit over-grown, so I got some landscaping timbers, boxed it all in and filled it with pea-gravel.  Now its an attractive area and we have some patio furniture set up, making it a nice outdoor oasis in the summer!
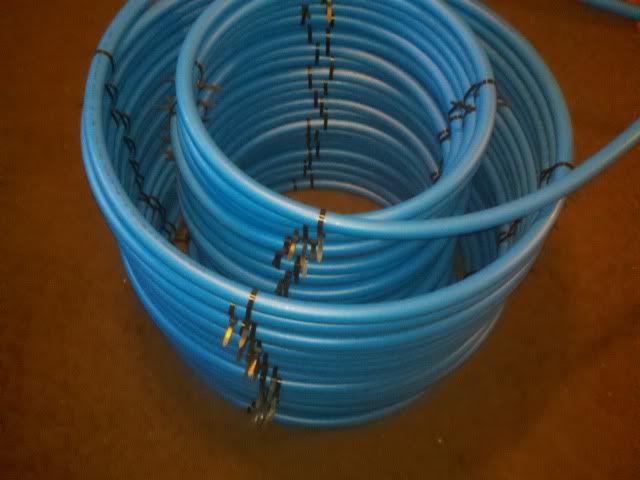


This is the 300' coil of 1" PEX.  It took a lot of time to form it into 2 neat concentric coils, but my efforts paid off and it came out beautiful!
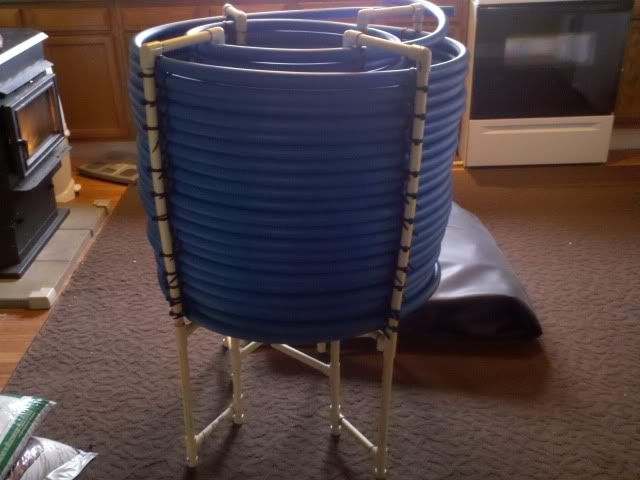


I wanted to coil to sit towards the top of my tank. Since the tank is pretty tall,  I made a small tower of CPVC to hold the coil in the right spot in the tank
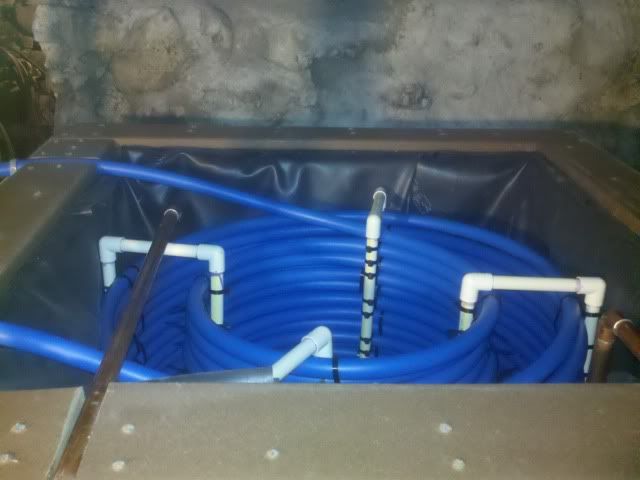


And here is the coil sitting in the tank..  If I could do something different, I would have made both coils just a bit smaller in diameter, but I'm pretty happy with the fit!
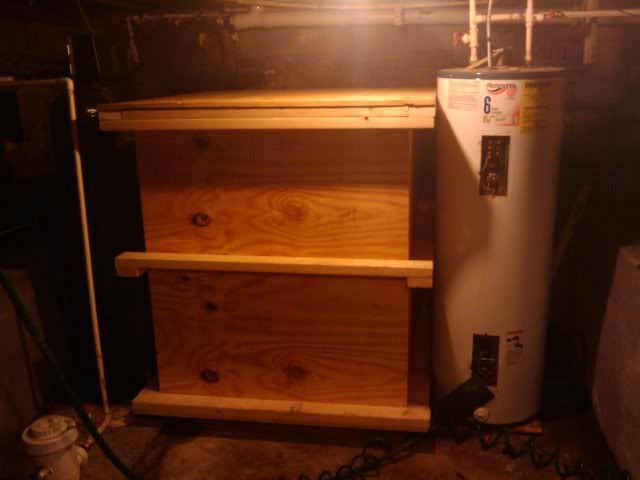

Here is a picture of the tank right after I built it 3 years ago, sitting right next to my hot water heater.  The tank looks a tiny bit taller than it really is because it sits on treated 4x4 lumber, keeping it off of my damp basement floor. Also, note the center perimeter reinforcement around the center, which I feel is necessary in taller tank designs.
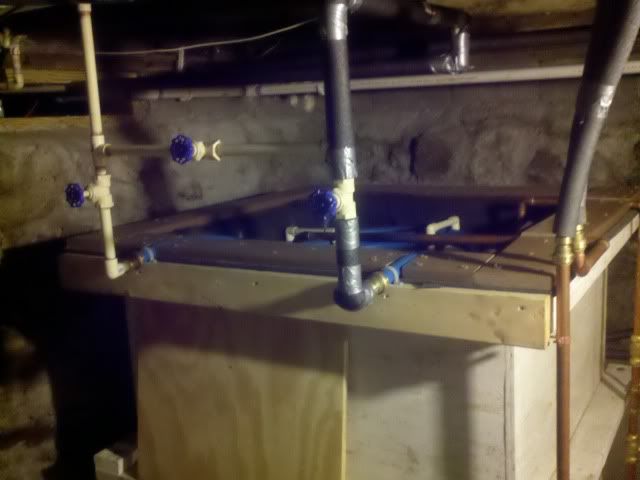

Here is an in progress shot of plumbing in the tank
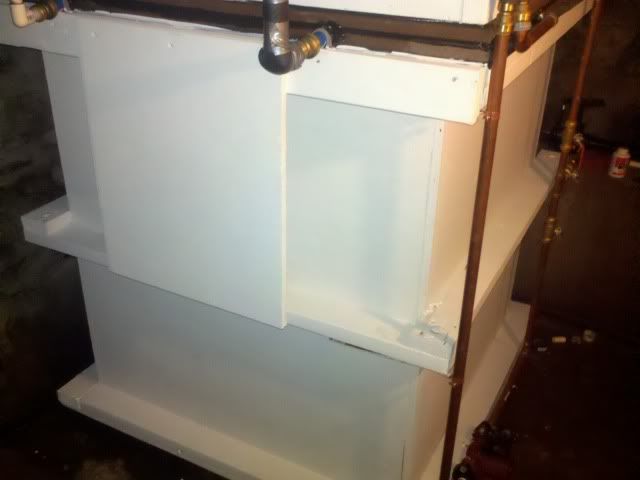

Here is the tank in position and painted
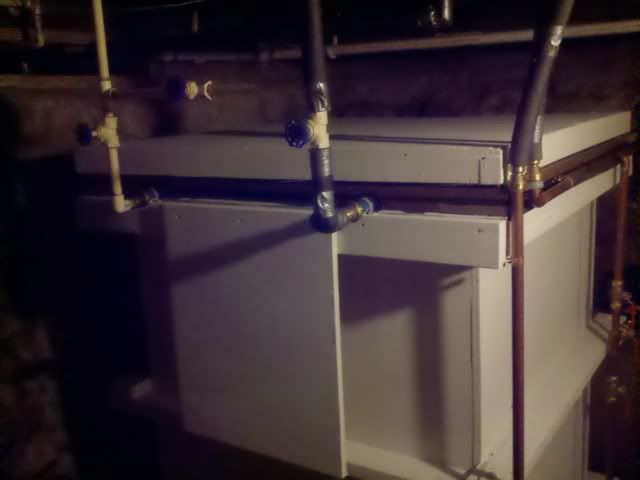

...and a different view



Here is the circuit board that I designed in Eagle (never done it before, it was both fun and frustrating!). It took me quite a while to get everything laid out so it would fit well on a single-sided circuit board!
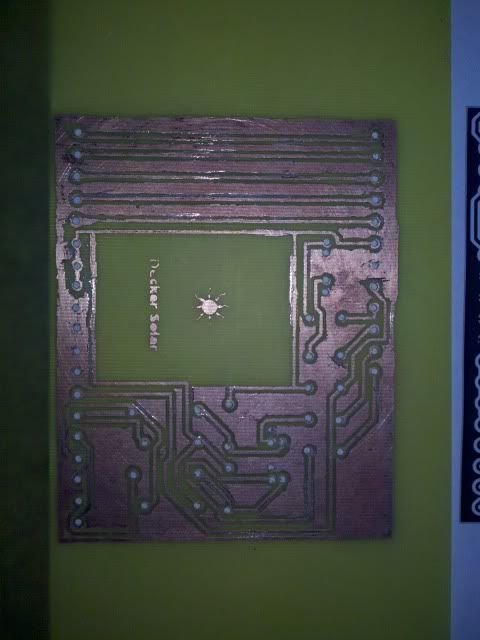

Got a working board made first try, though its a bit ugly thanks to the crudeness of the laser printer toner mask transfer method!
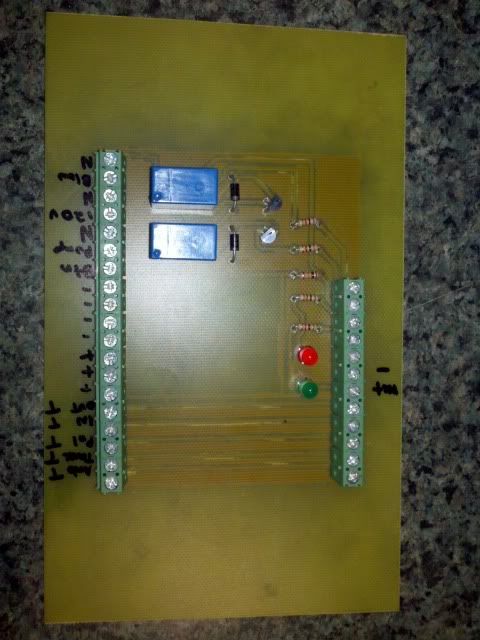


And here it is with all components installed and soldered!
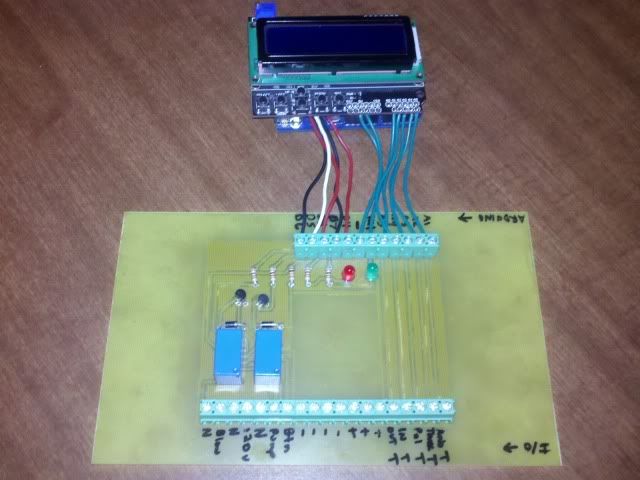

And finally, connected to the arduino board I wrote the programming for (I have been programming for about 20  years, so this part of the task was very easy for me!)
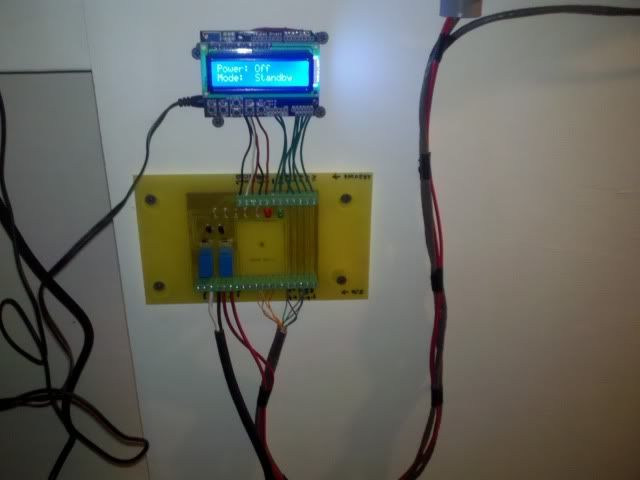


And lastly, on Monday, I connected the controller to the board, tested it by faking temperature signals, test ran the pump, etc.  Its sitting in standby mode right now, just waiting for some sun.  I really hope we get a couple of hours today! (its been raining for 2 weeks straight here :( )


As a side note,  in the last day I also fully insulated all pipes into and out of the system, including all hot water pipes in my home.  I spent to much time and effort into making this to generate hot water to let it waste off on its way to the shower or sink!


EDIT:
I just remembered that when I started this project in 2009, I posted here about it, and I found the post:
http://fieldlines.com/board/index.php/topic,130113.0.html

it was fun for me to read back on my initial thoughts and design goals. Specifically, I wanted to use seam tape to build a perfect liner for the tank. That failed miserably.  I learned the hard way that the simplicity of folding the liner into the tank ads so much reliability!  Because of this mistake, I had to buy another liner to start from scratch.  I lost probably over $200 trying to build a seamed liner, between the EPDM liner, seam tape, etc... In the end I learned something valuable - there is a reason for proven, trusted designs that have worked well for countless others!
« Last Edit: May 18, 2011, 09:14:45 AM by jondecker76 »

jondecker76

  • Full Member
  • ***
  • Posts: 100
Re: Just finished my solar water heater 2 days ago... (Image heavy)
« Reply #1 on: May 18, 2011, 09:17:55 AM »
Awww... I'm so depressed... It looked like sunshine first thing this morning, but now I have nothing but heavy cloud cover :(

I'll keep hoping for that sun to pop out sometime today!

ghurd

  • Super Hero Member Plus
  • *******
  • Posts: 8059
Re: Just finished my solar water heater 2 days ago... (Image heavy)
« Reply #2 on: May 18, 2011, 09:43:24 AM »
I do not understand why you want to keep the coils near the top of the tank.
Seems like it would be more efficient to keep them near the bottom?

It won't stop raining here.
G-
www.ghurd.info<<<-----Information on my Controller

TomW

  • Super Hero Member Plus
  • *******
  • Posts: 5130
  • Country: us
Re: Just finished my solar water heater 2 days ago... (Image heavy)
« Reply #3 on: May 18, 2011, 10:24:35 AM »
I do not understand why you want to keep the coils near the top of the tank.
Seems like it would be more efficient to keep them near the bottom?

It won't stop raining here.
G-

Heat concentrates in the top of the tank. Perfect for the heat pickup coil. The Pex is for the cold water line into the hot water system.

At least how I see it? But I haven't seen a pizza in days.  :o

Tom

ghurd

  • Super Hero Member Plus
  • *******
  • Posts: 8059
Re: Just finished my solar water heater 2 days ago... (Image heavy)
« Reply #4 on: May 18, 2011, 10:34:27 AM »

Heat concentrates in the top of the tank. Perfect for the heat pickup coil. The Pex is for the cold water line into the hot water system.

At least how I see it? But I haven't seen a pizza in days.  :o

Tom

OK, its the heat pickup coil.  Now it makes sense.

The plastic supports.  PVC or CPVC?  PVC can get pretty flimsey with much heat at all.

Sweet controller.
G-
www.ghurd.info<<<-----Information on my Controller

zap

  • Hero Member
  • *****
  • Posts: 1107
  • There's an app for that
Re: Just finished my solar water heater 2 days ago... (Image heavy)
« Reply #5 on: May 18, 2011, 10:43:21 AM »
Nice looking setup.


http://linuxmce.homelinux.com:8221 asks for a username and password.

jondecker76

  • Full Member
  • ***
  • Posts: 100
Re: Just finished my solar water heater 2 days ago... (Image heavy)
« Reply #6 on: May 18, 2011, 11:22:21 AM »
Yes, the 300' of 1" PEX is for heat pickup from the tank. The supports are made of CPVC to help withstand the heat in the tank, but it turns out that the PEX, even while filled with water, is pretty much neutrally bouyant with the water around it, so the supports don't actually do too much now that the tank is filled.


Just looked at satellite images, there might be a break in the clouds coming in a few  hours! I'll keep my fingers crossed!

Forgot to add, for viewing of the webcam, you have to use username: otherpower password:otherpower

jondecker76

  • Full Member
  • ***
  • Posts: 100
Re: Just finished my solar water heater 2 days ago... (Image heavy)
« Reply #7 on: May 18, 2011, 11:38:14 AM »
Boy am I impressed!

After realizing that my chances of seeing sun today are pretty much non-existent, I decided to see how it would do with some low-grade heat.  Even though we are under full cloud cover, the panel temperature has been around 90 all morning, so I went and adjusted the minimum panel temperature setpoint to 80 degrees - and the pump kicked on as it should. 

What I expected to see, is the pump run for a couple minutes, at which time the panel would cool back off. However, what I have found is this:
- The pump has been running for 15 minutes straight, and the panel temperature is staying above 90 degrees still (and we are under some really thick cloud cover - I couldn't even tell you where in the sky the sun even is!)
The water is leaving the tank at 55 degrees, and coming back at 80 degrees, and its sustaining this under full cloud conditions.  Granted, this wouldn't help me if I already had a tank that was up to temperature, but in my case  I guess picking up a little heat is better than none at all!

DanG

  • Hero Member
  • *****
  • Posts: 1122
  • Country: us
  • 35 miles east of Lake Okeechobee
Re: Just finished my solar water heater 2 days ago... (Image heavy)
« Reply #8 on: May 18, 2011, 11:55:16 AM »
Haw ~ leaving stuff to incubate in the basement works (sometimes) - great and truly huge system, good on you!

I'm curious how you combat possible stagnation - where panel loop temps can start strobing flashes of steam if/when pump is off - is the pickup loop done with gylcols? is there a pressure vent? will the circuit flow even with stalled pump?

Also curious how the pickup 'shelter' is to handle heat build up, esp. in summer?


jondecker76

  • Full Member
  • ***
  • Posts: 100
Re: Just finished my solar water heater 2 days ago... (Image heavy)
« Reply #9 on: May 18, 2011, 03:43:03 PM »
Dan

Thanks!   

The system is a drain back system, so stagnation shouldn't be a problem.  Polyiso insulation were used in the collector and the tank, so they can handle very high temperatures, and the tubes in the collector are copper.  In the case it doesn't drain back well for some reason, the pump should still come on (from sensing panel temperature) before boiling water in the lines becomes an issue. In the even that the pump fails, or interlocks because of  high tank temperature, even then I don't forsee a problem as its a non pressurized system and the steam could vent harmlessly into the top of the tank. Aside from that, I did plan ahead and put a solenoid valve above the highest point of the collector and an extra controllable relay on the controller - this gives me venting and even blowback options in the future should I find that I need them (the feature is already programmed but currently commented out of the code for now)


The EPDM rubber liner in the tank is good for 180 degree F use.  The temperature sensor in the tank along with the controller are set to cap this at 160 degrees for some extra head room.  Since the temperature sensors are so cheap - at $2 each to make - I may double up on sensors to handle cases where a temperature sensor goes bad, but I'm not sure if I'm paranoid enough for that yet.

The shelter I built around the collector is mostly for looks, but is insulated from the collector box with 1" PolyIso board.  I currently have my ambient temperature sensor in that shelter (I haven't had time yet to mount it outside of the shelter) so maybe it will be a good idea to leave it in there for now to get an idea if heat build-up is a problem or not.  If it is, some passive vents may be enough, or if need be I could get a bathroom fan installed in there or something.

Hopefully I've set myself up well enough to deal with some surprises if they arrive!

Madscientist267

  • Hero Member
  • *****
  • Posts: 1181
  • Country: us
  • Uh oh. Now what have I done?
Re: Just finished my solar water heater 2 days ago... (Image heavy)
« Reply #10 on: May 18, 2011, 04:46:54 PM »
Very nice. ;)

This is the flavor of project I've been considering for the first 'upgrade' to my house, since it's got the highest ROI. Once I get the time and money, that is...  ::)

I will be really curious to see what your savings are on this. In my situation, there's 4 of us regularly using a lot of hot water, and being how electric is the only means for us here, I want to get away from it ASAP.

Glad to hear that it puts out, even on cloudy days. It's not a super big surprise; I've gotten decent output from strategically aimed PV under cloudy conditions, sometimes as much as 1/3 of full output. Only makes sense that this would translate into similar results for DHW.

Keep us posted, looks like it was well worth the effort to put it together.

Steve
The size of the project matters not.
How much magic smoke it contains does !

DanG

  • Hero Member
  • *****
  • Posts: 1122
  • Country: us
  • 35 miles east of Lake Okeechobee
Re: Just finished my solar water heater 2 days ago... (Image heavy)
« Reply #11 on: May 18, 2011, 10:48:35 PM »
I was scolded back-channel for Ãœber-paranoia so I admit I 'needed' to hear your plans aloud even though I should've re-read earlier posts, blah blah and kept quiet.... THANKS for the clarity on your explanation. Still, I am suspicious of ever boiling collectors dry and letting oxygen and minerals have their way with the copper though...

I've got two 4x8 Solahart open circuit panels (incubating for use in closed-circuit from living in frost area) that suggest an automatic thermal circuit cut-in that forces an extra loop into circuit for thermosiphoning to a heat-shedding passive radiator (just a W shape copper pipe) in the shade of the panels themselves to keep temps from going nuklear and venting much steam or coolant or drying out the pickup loops if the normal heat dump is satisfied or unavailable.

Reading horror stories of temperatures getting away seriously, 300°F etc. when the panels are well insulated on a calm clear day, and those temperatures then eating away normal solder on the collectors etc. doesn't help motivate me to kludgeing together quickie system either. Thanks again, re-reading your notes now...

jondecker76

  • Full Member
  • ***
  • Posts: 100
Re: Just finished my solar water heater 2 days ago... (Image heavy)
« Reply #12 on: May 19, 2011, 04:30:06 PM »
Had my first few glimpses of sun today.  While it was cloudy all day, I did get a total of about an hour of direct sun today on the collectors.   The water coming back to the  tank was over 140 degrees during a good portion of this and I made the mistake of touching a piece of the exposed copper pipe coming into the tank - it burnt instantly!  The rest of the day, I let it collect some low-grade heat.  Its about 4:00 here now, so there won't be too much more action today.  Although it wasn't a great day for sun, I did bring my tank from 52 degrees this morning to 65 degrees right now - which comes out to be about 30,000 BTU of energy harvested today.  I can't wait to see what it will do on a good clear day!


rossw

  • Hero Member
  • *****
  • Posts: 834
  • Country: au
Re: Just finished my solar water heater 2 days ago... (Image heavy)
« Reply #13 on: May 19, 2011, 05:46:26 PM »
I did get a total of about an hour of direct sun today on the collectors.

The water coming back to the  tank was over 140 degrees during a good portion of this

I did bring my tank from 52 degrees this morning to 65 degrees right now - which comes out to be about 30,000 BTU of energy harvested today.

Thinking out loud here:
52 to 65 is 7.2 deg C rise in an hour, 30,000 BTU/Hr is equiv to about 8,800 watts.
8,800 watts will heat 17.5 litres of water by 7.2 deg in 1 minute.
Over an hour, thats 1000 litres - so around 220 gallons? Your tank didn't appear that big, or is the photo deceptive?

Yesterday, I finally got around to putting the first round of sensors on my tanks too, for much the same reasons!
I ran out of sensors, so it'll be a couple of weeks before I can do the next lot (other time commitments), but here's the start of mine (these tanks are 2000 litres - or around 450 gallons - each). (The DHW (Domestic Hot Water) is a heat exchanger in the top of the tank, which is opposite to how you've got your storage tank configured I think)

This link is only temporary, until it moves to its real home: My tank monitoring

Be interesting to compare results...

jondecker76

  • Full Member
  • ***
  • Posts: 100
Re: Just finished my solar water heater 2 days ago... (Image heavy)
« Reply #14 on: May 19, 2011, 06:10:40 PM »
Yes, my tank actually has almost 250 gallons of water in it (I had mineral-free water delivered by truck and we metered it in),  The internal dimensions of the tank are 36"x36"x46", and it is filled to about 1" below the top. 59616 CuIn / 231 = 258 gallons - take away for  the volume of the pex coil makes it right around 240-245 gallons or so.

Sounds like your setup is similar - the water in my tank recirculates through the panel.  The heat exchange coil (300' of 1" PEX) sits towards the top of the tank, and water is pre-heated in this coil on its way to the normal electric water heater.  Of course, I can bypass the electric  hot water heater all together, and/or bypass the solar preheater as well so there are a few modes I can run in (all electric hot water, electric hot water with solar preheat, solar hot water only).

Very cool web display on your temperatures, I plan on implementing some ethernet functionality on my controller so I can monitor temps, change setpoints, power on and off etc from the web

jondecker76

  • Full Member
  • ***
  • Posts: 100
Re: Just finished my solar water heater 2 days ago... (Image heavy)
« Reply #15 on: May 20, 2011, 08:10:47 AM »
Temperature of the storage tank dropped 2.5 degrees overnight, for a heat loss of about 5000 BTU.  This was with a 12 degree difference between the basement air and the tank temperature.  Even though the tank has 2" of polyiso insulation inside, I was surprised how hard it is to store this heat - it will only get worse at the differential between the tank and air temperatures rise.  I'm going to add some radiant insulation on the outside of the tank, with an additional 3.5" of insulation (this will fill the area between the 2x4 perimeter supports).

Today and tomorrow we should get some better sunshine, with tomorrow being a pretty sunny day..  I'm anxiously awaiting getting to see this thing in action on a good, clear day!

I re-adjusted the webcam, so the control panel is much easier to read now

jondecker76

  • Full Member
  • ***
  • Posts: 100
Re: Just finished my solar water heater 2 days ago... (Image heavy)
« Reply #16 on: May 20, 2011, 03:16:21 PM »
Having a partly cloudy day today - about 40% direct sun over time, the rest of the time varies in how thick the cloud cover is.    Though not a perfect day, I now have some observations and some questions that I need to answer.

Observations:
- Under direct sun, for the most part, there is a temperature rise of 10-13 degrees F from the collector inlet to the collector outlet. Under partial sun, the temperature rise is about half that.

- I now have some decent and consistent numbers on tank stratification.  The top temperature probe is in the water 3" from the top.  The inlet to the pump is 1" from the bottom of the tank - so there is 41" between these two points.  Since I have a temperature probe on the outlet of the pump, I can see this temperature difference between the top and bottom of the tank any time the pump is running.  After sitting for a while, The difference is 8 degrees F, and has been 100% consistent and predictable.  After a lot of agitation from the pump (the pump inlet is at the bottom and opposite corner from the collector return to help in agitation and mixing), this stratification at its lowest point was 4 degrees difference.

- Even under a fair amount of cloud cover, the collector does collect usable heat

- Simple differential temperature controllers may not be the best option for this type of solar setup, see scenario below


Here are my numbers so far today: (we had absolutely no sunshine before 11:30)

(TIME       TANK TEMPERATURE       BTU SINCE LAST   BTU/Hr
11:00      62
1:00        69         13994btu        6997btu/hr
1:30        71         3998btu          7996btu/hr
2:00        73         3998btu          7996btu/hr
2:30        74         1999btu          3998btu/hr
3:00        75         1999btu          3998btu/hr
4:00        77         3998btu          3998btu/hr

total btu generated over 5 hours: 29998
avg btu/hr: 5997
kwh equivalent = 29998  * 0.000293 = 8.79 KWH - wow, not bad for a cloudy day!

Not great numbers, but not bad for a day that is getting more cloud cover than sun! And there's still more time to collect a little more heat..  My numbers today are right on par with yesterday's numbers, so I have a good idea of what a partly cloudy day will do.


One thing to mention here:  The recommended standard is to provide 1 sqFt. of glazing for each 2 gallons of water.  I am at 1 sqFt. of glazing for every 3 gallons of water, so I did expect my temperatures to come up a little slower than other systems that I've read about that follow that standard closer.


Now, for some things that I need to think about:
Given the way the heat stratifies in the tank, I need to figure out the best way to determine when to shut the pump off (at what point am I losing heat and/or spending more on the energy to run the pump than I am collecting).  Take the following scenario which I witnessed today:
A) Tank temperature is 74
B) pump outlet temperature is 67
C) outlet of the collector is 72

Given the above scenario,  water was returning to the tank that was LOWER in temperature than the temperature of the tank measured at the top.... But because of the stratification of 8 degrees, water was still coming back HIGHER than what it was leaving at the bottom of the tank.  This leaves me to think I need to consider one of the 3 methods to determine when to shut down the pump:

1) When water coming into the tank is lower or equal to  the water leaving the tank at the bottom, shut the pump off. Though I'm thinking that sending water into the top of the tank that is 8 degrees less than the water temperature at the top of the tank, isn't such a great idea.

2) When the water coming back into the tank is lower than the temperature measured at the top of the tank, shut the pump of..  Downside here is that I could be missing out on a significant amount of heat collection

3) Maybe compute an average tank temperature - the average between the top and bottom temperature of the tank..  Then shut the pump off if we fall below this average.  This is currently where my train of thought is.

Anyone got any opinions on this? Gary?

thanks

« Last Edit: May 20, 2011, 04:58:13 PM by jondecker76 »

rossw

  • Hero Member
  • *****
  • Posts: 834
  • Country: au
Re: Just finished my solar water heater 2 days ago... (Image heavy)
« Reply #17 on: May 20, 2011, 05:28:35 PM »
After sitting for a while, The difference is 8 degrees F, and has been 100% consistent and predictable.  After a lot of agitation from the pump (the pump inlet is at the bottom and opposite corner from the collector return to help in agitation and mixing), this stratification at its lowest point was 4 degrees difference.

I see *substantially* more gradient than that in my tanks - over 20C (38F) is common, over the top 4'6". Stratification is not necessarily a bad thing BTW!

Quote
Given the way the heat stratifies in the tank, I need to figure out the best way to determine when to shut the pump off (at what point am I losing heat and/or spending more on the energy to run the pump than I am collecting).  Take the following scenario which I witnessed today:
A) Tank temperature is 74
B) pump outlet temperature is 67
C) outlet of the collector is 72

Given the above scenario,  water was returning to the tank that was LOWER in temperature than the temperature of the tank measured at the top.... But because of the stratification of 8 degrees, water was still coming back HIGHER than what it was leaving at the bottom of the tank.  This leaves me to think I need to consider one of the 3 methods to determine when to shut down the pump:

1) When water coming into the tank is lower or equal to  the water leaving the tank at the bottom, shut the pump off. Though I'm thinking that sending water into the top of the tank that is 8 degrees less than the water temperature at the top of the tank, isn't such a great idea.

2) When the water coming back into the tank is lower than the temperature measured at the top of the tank, shut the pump of..  Downside here is that I could be missing out on a significant amount of heat collection

3) Maybe compute an average tank temperature - the average between the top and bottom temperature of the tank..  Then shut the pump off if we fall below this average.  This is currently where my train of thought is.

Anyone got any opinions on this?

I've got a couple of thoughts on this.
* As long as the temp differential across your pipes (flow and return) measured inside (ie, not actually at the collector itself) is positive, you've got a nett heat gain.
* I don't know what the "conventional wisdom" on this is, but thats the reason I return my solar input only 2/3 of the way up the tank. The theory is that water entering will find its own level (based on its density, which is of course temperature dependant). My hope is that in the hottest part of the day, the hottest water (over 80C/176F) will go straight up to the top of the tank, and cooler water at other times of the day will settle out lower down.
* Have you considered a variable-speed pump (or even just a two-speed). When energy collection is lower, running the pump more slowly will give you higher temperatue output water. (To some extent this is obviated if you're "batch-heating" and only running the pump when the water is hot enough)

As for stratification - it's a good thing if you have the hottest water at the top, undisturbed, as thats how you'll get max heat transfer out later.

Try to think too, however, about the thermodynamics of that hot water being cooled. If you have a cylinder of a given height, with 6" of really hot water at the top, and 42" of luke-warm water at the bottom, you'll get good initial heat transfer but that hot water will quickly cool and sink - and all you have is  luke-warm tank. If you had been continuing to add heat (but not at the highest temperature), the "luke warm" water might be "comfortably warm"... still cooler, but a lot more total energy in your tank. As long as it's warmer than your "raw" water, you're getting a benefit from it.

jondecker76

  • Full Member
  • ***
  • Posts: 100
Re: Just finished my solar water heater 2 days ago... (Image heavy)
« Reply #18 on: May 20, 2011, 06:43:08 PM »
My return water from the collector goes into the top of the tank above the water in vapor space- this is so it does not create a vapor lock, and the collector can drain back.  I'm on the fence on whether or not there is really a difference with the stratification in the tank - I think in the end, whether it is stratified or not will not matter so much, and heat will still be picked up efficiently by my heat exchange coil. However, since I do have a solenoid operated "vent" at the collector, I could open it to allow drainback while piping my collector return water to the bottom of the tank.  I'm just not yet convinced that there will be much benefit...

Re: stratification - my 8 degrees is rather misleading... The pump inlet is an inverted U-tube which goes over the top of the tank (so that I would have no punctures in my EPDM liner - i considered bulkhead fittings but talked myself out if it).  Therefore, any water drawn from the bottom of the tank gets heated as it rises up the suction line through the hotter "layers" of water on its way up over the sidewall and to the pump... Taking this into account,  my stratification is probably similar to yours, and its a factor I didn't consider until now.  Oh how I wish I had put a temperature sensor under my liner to get an accurate bottom temperature! Another factor that I need to be patient for, is to see how much this dynamic changes once I get my tank to much higher temperatures!

My temperature sensors for the tank, the pump outlet, and the tank inlet from the collector - are all located at the tank, so the difference in temperature between the water coming into the tank from the collector, and leaving the tank to the collector are in places where any heat lost in transit is already accounted for.


My analog inputs to the arduino based controller are all taken up, but I think my plans moving forward should include taking away the ambient temperature reading in favor of putting a deep temperature probe in the bottom of the tank so I can more accurately measure stratification in the tank (it would be more valueable to me than the ambient reading I take now).

I think it may also be worth my time to pipe the pump return to the bottom of the tank, and connect the solenoid vent valve at the collector to my controller and use that for the purpose of eliminating vapor-lock and allowing the collector to drain back (though this introduces a new point of failure).


Regarding when to shut off the pump, I'm still leaning towards an "Average" tank temperature, even if your explanation that heat in > heat out= net gain seems correct from a logical point of view. For example, if the top of the tank reads 100 degrees, and the bottom reads 50 degrees,  you can say that the average tank temperature is 75 degrees...    My thought is that by putting water in the tank that is lower than the average temperature, will lower the average temperature.    I guess I need to sort this out and so some real world tests, but of course I'd love to hear multiple point of views on this!
« Last Edit: May 20, 2011, 06:49:15 PM by jondecker76 »

rossw

  • Hero Member
  • *****
  • Posts: 834
  • Country: au
Re: Just finished my solar water heater 2 days ago... (Image heavy)
« Reply #19 on: May 20, 2011, 08:39:17 PM »
Regarding when to shut off the pump, I'm still leaning towards an "Average" tank temperature, even if your explanation that heat in > heat out= net gain seems correct from a logical point of view. For example, if the top of the tank reads 100 degrees, and the bottom reads 50 degrees,  you can say that the average tank temperature is 75 degrees...    My thought is that by putting water in the tank that is lower than the average temperature, will lower the average temperature.    I guess I need to sort this out and so some real world tests, but of course I'd love to hear multiple point of views on this!

Unfortunately, simply taking the top and bottom temperatures and averaging them doesn't give you a meaningful figure. I developed some pretty extensive precision datalogging stuff many years ago for the Murray Darling Freshwater Research Centre - including a system specifically to measure and quantify water stratification layers (although this was with a view towards oxygen levels, BoD, fish and plant growth etc).

If you could make a string of sensors (can you say a dozen DB18B20s equally spaced in a waterproof tube?) and worked an *energy* profile, I think you'd have some valuable data towards helping everyone understand how these tanks really behave internally!

All my early stuff used thermisters and 3rd order polynomials for temperature measurement. Of late, I've fallen in love with the accuracy, precision and pre-calibrated-convenience of the DS18B20 sensors, and that you can stack a bunch of them on a one-wire bus and only need one (digital) IO pin to talk to them all! (Their relative slowness is the only downside)

Madscientist267

  • Hero Member
  • *****
  • Posts: 1181
  • Country: us
  • Uh oh. Now what have I done?
Re: Just finished my solar water heater 2 days ago... (Image heavy)
« Reply #20 on: May 21, 2011, 07:20:41 AM »
Just a thought, but what about returning the water from the panels at the bottom of the tank rather than the top? Or at least below the transfer coil?

I have no idea in terms of ability to back the hypothesis up, but it would seem that at least that way you are displacing all cooler water than what is coming from the panels... ???

Steve
The size of the project matters not.
How much magic smoke it contains does !

jondecker76

  • Full Member
  • ***
  • Posts: 100
Re: Just finished my solar water heater 2 days ago... (Image heavy)
« Reply #21 on: May 21, 2011, 07:44:45 AM »
Today is going to be the first clear sunny day for me, I'm looking forward to collecting some good data today!

I put some radiant insulation on the tank last night.  From 9:00PM last night until 6:00AM this morning, the tank only lost 1 degree F as measured at the top of the tank - much better than the losses from the day before!


I've done a LOT of reading over the last day as it pertains to thermal storage and stratification.  When I initially built the tank, it was with the idea that it should be mixed well and uniform in temperature (which is why I laid out the inlet and outlet to the tank in such a way as to help provide this agitation).  From what I am reading, this is all wrong unfortunately :(
For the sake of others, I'll paraphrase here.
Stratification is very desirable in this type of system, and steps should be taken to ensure the greatest amount of stratification possible in  your storage tank.  The reason is, you want to be able to take the coldest water from your system (At the bottom of a relatively undisturbed tank) to put to your collector.  The greater the temperature differential, the greater the movement of heat; therefore you want your coldest water going to your collector, to take advantage of the extra efficiency offered by the greater differential of temperature (I.e. you will pick up much more heat by sending 90 degree water from the bottom of your tank to a 120 degree collector, than you would by sending 119 degree water from the top of your tank to a 120 degree collector).  Likewise, by mixing your tank vs. stratifying your tank will also have efficiency implications in your heat exchange coil for domestic hot water for the exact same reasons.

Given the above, the standard DIY tank design has several opportunities for improvement:
1) The inverted U tube from the bottom of the tank to the pump inlet pre-heats the water from the bottom of the tank on its way up to the pump.  There would be an increase of efficiency if the water could remain as cold as possible on its way to the pump.  This could be done by A) using a bulkhead fitting and getting rid of the inverted U-tube, but this introduces a point of failure and isn't as friendly to the DIY crowd.  B) Insulate the inverted U-tube so that you can reduce the amount of heat picked up by water on its way to the pump.

2) Taller tanks offer better stratification.  It should be more of a standard to building taller, more rectangular tank shapes instead of square shapes, or rectangular tanks laid horizontally.

3) Plumbing in the tank needs more design attention to eliminate mixing of the tank, and retain as much stratification as possible.  "Stratification tubes" (http://www.aljezurfarm.com/DIY%20stratification%20tube%20for%20heat%20storage%20tanks.htm) would be easy to fabricate for most DIYers.  Since most DIYers won't want to puncture their liner, the collector return will have to dip to the bottom of the tank before going back up the stratification tube, and therefore would need insulated.  This will help the return water from the collector to be added to the tank at the correct stratification level, and greatly reduce agitation in the tank.

4) Because of stratification, calculating your efficiency and energy collection based on a single tank temperature can be largely inaccurate and vary greatly even from day to day.  The correct way to calculate your figures should be from duration, known flow rate, and temperature rise at the collector (or inlet/outlet temperature at the tank)

5)  As much of your heat exchange coil needs to be as high as possible in the tank.  The heat exchange coil should be in the top 1/2 to 1/3rd of the tank.
.


I still have a lot of data to collect, which I will do over the next few weeks (for later comparison), after which time I am going to put things in motion as detailed above to improve stratification in my tank and attempt to share some efficiency comparisons.  Hopefully we will continue to improve the efficiency of this design for the benefit of everyone


rossw:
You've been right on with your advice so far, its appreciated!
I almost went with DS18B20 1-wire sensors, but went with the simple LM-35/TMP-35 instead.  They are also quite accurate!  Though I may experiment with the DS18B20 to see which I prefer.  Slow read times are no big deal in this application, and in fact, I read the 5 LM35 sensors in round-robin fashion for 2 seconds each to keep accuracy high.


Here are some good sources for information on the subject:
http://www.aljezurfarm.com/Stratified%20heat%20storage%20tank%20for%20solar%20home%20heating.htm

http://www.sun-volt.com/blog/2009/06/03/hot-water-tank-stratification/

http://www.arpnjournals.com/jeas/research_papers/rp_2011/jeas_0211_454.pdf

http://davidmdelaney.com/water-tank-strat/stratification-hot-water-tanks-page-1.html

Madscientist267

  • Hero Member
  • *****
  • Posts: 1181
  • Country: us
  • Uh oh. Now what have I done?
Re: Just finished my solar water heater 2 days ago... (Image heavy)
« Reply #22 on: May 21, 2011, 08:26:39 AM »
That stratifier pipe thing is pretty wild... Never really thought that the water temps would make that much of a difference, at least to where it would physically modify the behavior of flaps.

I would have thought that the pressure would have just opened them all roughly the same amount... Guess not! :)

So then I guess my idea was right and wrong all at the same time... just depends on the water temperatures! ;D

Steve
The size of the project matters not.
How much magic smoke it contains does !

jondecker76

  • Full Member
  • ***
  • Posts: 100
Re: Just finished my solar water heater 2 days ago... (Image heavy)
« Reply #23 on: May 21, 2011, 06:37:55 PM »
Today turned out to be a pretty decent day.  There was a couple hours of pretty heavy cloud cover (right around solar noon too, figures!) but aside from that the rest of the day was pretty much clear!

Today I started at 74 degrees measured at the top of the tank.  I ended at 96 degrees at the top of the tank..  This equates to about 43982BTU, which averages out to 6283 BTU/Hr. This is equivalent to 12.88kwh of energy! (these calculations include the inaccuracies of using a single tank temperature as a basis. I  have started programming the energy monitor for my controller, however, so in the future I should have much more accurate energy estimates!)

One thing that became obvious today was the fact that I am losing stratification and therefore losing efficiency as the day goes on.  I could tell this because the temperature rise through the collector was less and less as the day went on, which also slowed the rise of degrees per hour of the tank and also the air temperature inside the collector continued to climb as well throughout the day.  If I can gain 10% by fixing my stratification issues, this would be a huge performance boost for me, as my collector is quite undersized for my tank.  I just measured my glazing, and this whole time that I thought I had about 80 sqFt of collector actually came out to be 66 sqft. Yikes!  I have just a little over 3 and a half gallons of water for every square foot of glazing area.  I wish I would have researched the relation between glazing area and storage space a bit more at the start of the project.  Moving forward from here, I may either let a little water out of my tank, or add some more collector area in the long run. But for now, 66 sqFt can produce anough hot water for me to be happy, and in fact my early estimates are showing that I should be able to capture about 60,000BTU per day in the summer, which is plenty for my family (my error was more in oversizing the tank than undersizing the collector, but in the end now that I should do something about it, I'd rather just add more glazing in the future - besides, adding a couple of parallel circuits to my existing serpentine collector will help a lot in reducing resistance to flow!)


Here are my numbers for the day.

TIME     PANEL     TANK   TANK_OUT     TANK_IN      NOTES
0932    110         74                                              (pump kicks on for the first time)
1000    108         75      74                 79
1030    108         77      71                 76
1100    110         79      72                 77
1130    115         80      73                 79
1200    115         83      75                 81
1230    120         85      76                 83               Panel just starts really kicking in
1300    116         86      78                 85               Oh no!  Sun mostly behind cloud cover since 1245!
1330    109         88      80                 81               A lot of cloud cover still :(
1400    109         89      81                 83               still a lot of cloud cover.....
1430    111         90      82                 84               cloud cover still...
1500    111         91      84                 86               Sun just came back! Nice and strong too!
1530    124         93      86                 88               This is where I can tell I've lost stratification and efficiency is starting to suffer!
1600    123         95      86                 88
1630    119         95      87                 88               Wow, efficiency is still diving :(
1700    111         96      88                 88               Pump just shut down a few minutes ago


I kept asking myself why the return temperature from the collector was lower than the tank temperature, yet the tank temperature still came up.  I think this is because of the pretty steep downslope on the return line and pretty slow flow rate.. The temperature probe is on the top of that return line on a horizontal section just before entering the top of the tank.  I'm guessing that the pipe isn't 100% full of water to the top and I'm getting a low reading because of that.


My last task of the night is going to get a bucket, a good scale and take some time to get an accurate flow rate, as I can only guess right now.


jondecker76

  • Full Member
  • ***
  • Posts: 100
Re: Just finished my solar water heater 2 days ago... (Image heavy)
« Reply #24 on: May 21, 2011, 08:30:01 PM »
Ok, did some tinkering....

First,  I did some flow tests.  The results were pretty surprising..  On my Gundfos 15-58 3 speed pump, here is my flow rate at all 3 speed settings:

1) 1 gallon filled in 40.5 seconds = 1.48 GPM (this is where I have been running it)
2) 1 gallon filled in 34.2 seconds = 1.75 GPM
3) 1 gallon filled in 31.1 seconds =  1.93 GPM

I was expecting MUCH higher flow rates, but again, unfortunately I did a lot of research on the fly, and after the fact.  The top of my panel is about 15 ft higher than the pump, which fits in the pump curve head pressure chart nicely.. HOWEVER,  I made my serpentine collector with 90 degree elbows, 30 of them to be exact.  It wasn't until recently that I learned how much resistance (and "artificial head" it presents to the pump!).  I also didn't know that they made smooth bend copper U-pipes that I could have  used for each 180 degree turn instead of 2 90 degree elbows - those would have not only saved me a lot of soldering, but really cut down on the resistance to flow!
So from now on, the pump will run on the #3 setting, at just a bit under 2GPM and I'm going to have to live with that - on the plus side, it should increase efficiency some. I'm thinking that I should be more towards 3GPM ideally though, but I'd like to  hear opinions on that....


The 2nd bit of tinkering I did was on the return line into the tank from the collector.  The return line from the collector is 1/2" PEX, and it is stepped up to 3/4" copper just before entering the tank.  My probe is mounted to the top of the level copper pipe,  which made the water run along the bottom of the pipe into the tank.  For testing purposes, I rotated this line so that there is a  dip in it before entering the tank, which means water should now fill the 3/4" copper tube completely, allowing me to get a more accurate reading of temperature coming back into the tank. Pic of this modification below:


Now for a question - does anyone have any good suggestions on how to insulate the inverted U-tube that goes into the suction of the pump (inside the tank).  It has to insulate, stand up to water for a long time, and hold together in the high temperature as well..  I was considering building a small box-column around the pipe with 1" polyiso (Super Tuff R), but I'm afraid this will start to fray and break down in the water.  I want to do this so that I can preserve the colder temperature from the bottom of the tank on its way up and over the sidewall to the pump.  I have 1.25" PVC and some of the foamy pipe insulation, and they all fit together like a glove to have 3/4" copper pipe centered in the pvc by the foamy insulation, then I could seal the ends somehow to keep in dry in the insulation...  But I'm worried about the PVC in temperatures up to potentially 160 degrees....  It won't be carrying water or pressure (it would just be an insulation jacket), but i'm not sure how it would do in the environment in the tank.


I'm still working on the energy monitor programming for the controller.. In short, what it will do is:
take a sample reading of the difference in temperature exiting and leaving the storage tank once per second, and average them after 60 seconds. Also, at this 60 second mark, calculate BTU as a function of [averageTemperatureRise * GPM * WaterDensity((tankOutletTemperature+(averageTemperatureRise/2))).  I can further calculate the current BTU/hr rate, the total BTU since last reset, KWH equivalent since last reset, and current equivalent watts output.  If I ever start measuring sun intensity (in watts/sqft), I can also calculate and display a realtime efficiency, but this will come later.  I'm hoping to have the energy monitor functioning in the next couple of days, though the weather forecase looks TERRIBLE for the next week or so :(....  Then the plan is to compare the energy monitor calculations to the typical calculation which relies solely on a single tank temperature probe, and see how accurate that method is.


Also, I'm going to continue to post here to use this as my diary for experimenting with this setup and trying to improve efficiency, so I'm not necessarily always looking for feedback (just documenting my progress and experiments) - though any ideas and feedback would surely prove to be helpful
« Last Edit: May 21, 2011, 08:42:48 PM by jondecker76 »

jondecker76

  • Full Member
  • ***
  • Posts: 100
Re: Just finished my solar water heater 2 days ago... (Image heavy)
« Reply #25 on: May 21, 2011, 08:33:49 PM »
Observation made over the last couple of days:
An average shower drops my tank temperature (as measured at the top) by about 2 degrees F, which mathematically works out to be that the shower consumed7-11 gallons of 120 degree water from my electric water  heater (which was warmed from 53 degrees coming from the well).
« Last Edit: May 21, 2011, 09:18:24 PM by jondecker76 »

rossw

  • Hero Member
  • *****
  • Posts: 834
  • Country: au
Re: Just finished my solar water heater 2 days ago... (Image heavy)
« Reply #26 on: May 21, 2011, 10:13:07 PM »
So from now on, the pump will run on the #3 setting, at just a bit under 2GPM and I'm going to have to live with that - on the plus side, it should increase efficiency some. I'm thinking that I should be more towards 3GPM ideally though, but I'd like to  hear opinions on that....

I'm not convinced running the pump at high flow rates will really help efficiency, if it results in low differential temperatures

Quote
For testing purposes, I rotated this line so that there is a  dip in it before entering the tank, which means water should now fill the 3/4" copper tube completely, allowing me to get a more accurate reading of temperature coming back into the tank.

I generally tape my sensor to the side of a pipe. If it's copper, and it's lagged properly, there will be no measurable difference in temperature from bottom to top of pipe - thermal conductivity of the pipe is very high, and if insulated so you don't lose heat to the outside world, should be the same.

On the sensor subject: I've got older systems using thermisters, where I wanted to ensure the sensor wasn't electrically connected to the pipes. I devised a very simple solution. A quick layer of PTFE thread tape over the pipe, then lay the sensor against it, then run back over it with PTFE. It seals everything up nicely, and insulates it - but is still a pretty good heat path. Then cover the whole thing with the foam insulation as you have done. It works so well, I've continued to do it with RTD and DS18B20 sensors.


Quote
Now for a question - does anyone have any good suggestions on how to insulate the inverted U-tube that goes into the suction of the pump (inside the tank).  It has to insulate, stand up to water for a long time, and hold together in the high temperature as well..  I was considering building a small box-column around the pipe with 1" polyiso (Super Tuff R), but I'm afraid this will start to fray and break down in the water.  I want to do this so that I can preserve the colder temperature from the bottom of the tank on its way up and over the sidewall to the pump.  I have 1.25" PVC and some of the foamy pipe insulation, and they all fit together like a glove to have 3/4" copper pipe centered in the pvc by the foamy insulation, then I could seal the ends somehow to keep in dry in the insulation...  But I'm worried about the PVC in temperatures up to potentially 160 degrees....  It won't be carrying water or pressure (it would just be an insulation jacket), but i'm not sure how it would do in the environment in the tank.

The closed-cell, high-temperature foam/rubber pipe insulation ("Armaflex" here, may be similar over there) may be suitable. It's rated -297F to +220F. Not sure if it will stand continual immersion. It would be worth a try.

As for reducing the capacity of your tank - the easiest thing IMO (for testing anyway) will be to make something that simply displaces water, rather than re-making the tank from scratch. (Although that said, if you were to re-make it, you would have the oportunity to make it taller, use a bulkhead compression fitting for the bottom connection (they're easy to make and waterproof).

(If it were me, and I was using a liner like you have - I'd get some 1" or 3/4" brass threaded pipe - the plumbing stores have them. Something long enough to get through the entire wall thickness of your tank, plus some. You can get large washers for it, and cut some rubber/neoprene close fitting washers, or use some O-rings. Squash the O-ring or rubber washer between the liner and the washer (with another nut and washer on the back side of the liner for support) and it's good. Another pair of nuts to give it mechanical support to the outside of your tank and you're done.)

Quote
If I ever start measuring sun intensity (in watts/sqft), I can also calculate and display a realtime efficiency, but this will come later.

I can help you somewhat with that. I got a pyranometer a while ago for exactly this purpose. The downside is that its not really the right animal for the job. However, for your *specific* application, it would be near perfect - its built in cosine correction will work to your advantage - as long as you install it *WRONGLY*. They are designed to be installed perfectly flat and level, because they're intended to measure radiation falling on the ground (well, on a flat plane parallel with the mean ground), but what YOU want is to measure the power available to your heater, so installing it with the same orientation as your panels is perfect. The one I got cost around $200 USD, and includes an amplifier so I have 0-5V output, corresponding to exactly 0.25W/m^2/mV which interfaces nicely. (I do a heap of maths to come up with an estimate of available power at any given time of day by working out the suns position in the sky and "un-doing" their cosine correction. It works very well as long as there's little cloud. Diffuse illumination causes havoc though, and the inexpensive pyranometers are not very good at angles over 75 degrees from "square on" - not normally a problem, as if the sun is only 10 deg above the horizon there isn't much energy landing on the ground, so error is not much of a drama to the average person). Check http://weather.albury.net.au/ under "Solar Insolation"

« Last Edit: May 21, 2011, 10:23:46 PM by rossw »

frackers

  • Sr. Member
  • ****
  • Posts: 435
  • Country: nz
  • Picard spits "Hello"
Re: Just finished my solar water heater 2 days ago... (Image heavy)
« Reply #27 on: May 22, 2011, 04:26:38 AM »
Just a thought, but what about returning the water from the panels at the bottom of the tank rather than the top? Or at least below the transfer coil?

I have no idea in terms of ability to back the hypothesis up, but it would seem that at least that way you are displacing all cooler water than what is coming from the panels... ???

Steve


All the solar tanks I have seen take the water about 15% from the bottom and return it at about 25% from the bottom. If it really is hotter then it will move up towards the top of the tank anyway. Today is a typical day (we're just coming into winter here) where the top of my tank reading is 57c and the bottom sensor (actually at about the 25% up point) is at 48c.
Robin Down Under (Or Are You Up Over)

rossw

  • Hero Member
  • *****
  • Posts: 834
  • Country: au
Re: Just finished my solar water heater 2 days ago... (Image heavy)
« Reply #28 on: May 22, 2011, 05:17:26 AM »
All the solar tanks I have seen take the water about 15% from the bottom and return it at about 25% from the bottom. If it really is hotter then it will move up towards the top of the tank anyway.

Sounds good in theory, but the practice is that the hot water (while rising in the tank):
 * causes circulating currents which mixes water
 * cools as it passes through the denser, colder water

You do end up heating the whole tank, but at the expense of lower "top of tank" temperature (except where you have heaps of solar input and can heat the bulk of the tank to the required temperature anyway).

jondecker76

  • Full Member
  • ***
  • Posts: 100
Re: Just finished my solar water heater 2 days ago... (Image heavy)
« Reply #29 on: May 22, 2011, 08:41:59 AM »
Looking for opinions on flow rate...  It turns out after my testing last night that my 3-speed pump puts out almost exactly 1.5GMP, 1.75GPM and 2.0GPM.  Any suggestions which of the 3 speeds I should run, or what an optimal flow rate for me would be if outside that range?

Also, I finished the energy monitor code for the controller.  If anyone cares to double check math or make suggestions, here is the finished class that I will be using.  I'm going to upload the code to the controller tonight when I get home.

Code: [Select]

#ifndef energyMonitor_h
#define energyMonitor_h
/*
Energy Monitor Class
For hot water systems

This class will track temperature rise, and with a known flow rate calculate the following:
-BTU totalizer (resettable)
-KWH equivalent totalizer (resettable)
-Current BTU/Hour rate (updated once per minute)
-Current equivalent Watt rate (updated once per minute)

usage example:

#include "energyMonitor.h"

float flowRate=1.48 //GPM
EM monitor;

void setup() {
  Serial.begin(4800);
 
  //Tell the energy monitor what our flowrate is!
  monitor.init(flowRate); 
}

void loop() {
  float temperatureOut=82.0; Degrees F
  float temperatureIn=100.0; Degrees F
 
 //Update the energy monitor.  This takes care of
 //sampling the temperature rise, as well as performing
 //the needed calculations once per minute.
 monitor.update(temperatureIn,temperatureOut);
 
 Serial.println(monitor.getTotalBTU);
}
*/
class EM {
private:
  int   m_iMonitorFreq;                //Seconds
  unsigned long m_ulNextTimestamp;     //Milliseconds
  float m_fPumpFlowRate;               //GPM
  float m_fCumulativeRise;             //Temperature Rise sampler
  int   m_iNumRiseSamples;             //Temperature Rise sampler
  float m_fLastBTUCalc;                //Last calculated BTU
  float m_fTotalKWH;                   //Totalizer
  float m_fTotalBTU;                   //Totalizer
 
  void calculate(float _fTemperature);
  void reset();
  float waterDensity(float _fAvgTemperature);

public:
  EM();
  ~EM();
  void init(float _fFlowRate);
  void update(float _fTemperatureStart, float _fTemperatureEnd);
  void  resetTotalizers();

  float getTotalKWH();
  float getTotalBTU();
  float getCurrentWatts();
  float getCurrentBTUpH();

};

EM::EM() {
  m_iMonitorFreq=60; //60 seconds hard coded for now, but could expose this at a later time to the user
}

EM::~EM() {

}

void EM::init(float _fFlowRate) {
  m_fPumpFlowRate=_fFlowRate;
  m_fCumulativeRise=0;
  m_iNumRiseSamples=0;
}

void EM::reset() {
  m_ulNextTimestamp=millis() + (m_iMonitorFreq * 1000);
  m_fCumulativeRise=0;     
  m_iNumRiseSamples=0;
}

void EM::update(float _fTemperatureStart, float _fTemperatureEnd) {
  //Compute the temperature rise
  float fTemperatureRise=_fTemperatureEnd - _fTemperatureStart;
 
  //See if its time to update!
  if( (long) (millis() - m_ulNextTimestamp) >=0 ) {
    calculate(_fTemperatureStart);  //Update the calculations
    reset();      //and reset the sampler
  }
 
  //Sample temperature rise
  m_fCumulativeRise +=  fTemperatureRise;
  m_iNumRiseSamples++;
}

void EM::calculate(float _fTemperature) {
  //Get the average rise
  float fAvgRise = m_fCumulativeRise / m_iNumRiseSamples;

  //Get the average temperature for water density calculation
  float fAvgTemperature = _fTemperature + (fAvgRise/2.0);
 
  //Calculate BTU
  m_fLastBTUCalc=fAvgRise *  (m_fPumpFlowRate *(m_iMonitorFreq/60.0)) * waterDensity(fAvgTemperature);
  //Add to totalizers
  m_fTotalBTU+=m_fLastBTUCalc;
  m_fTotalKWH=m_fTotalBTU/3413.0; 
}


float EM::getTotalKWH() {
  //Return the totalizer
  return m_fTotalKWH;
}

float EM::getTotalBTU() {
  //Return the totalizer
  return m_fTotalBTU;
}

float EM::getCurrentBTUpH() {
  //Convert BTU/Hr to Watts
  return  (m_fLastBTUCalc * (60.0/m_iMonitorFreq)) * 60;
}


float EM::getCurrentWatts() {
  //Convert BTU/minute to Watts
  return (m_fLastBTUCalc * (60.0/m_iMonitorFreq)) * 17.5842642 ;
}

void EM::resetTotalizers() {
  m_fTotalKWH=0;
  m_fTotalBTU=0; 
}

float EM::waterDensity(float _fAvgTemperature) {
  float fDensityAt32  = 8.3436; //water density at freezing
  float fDensityAt212 = 7.9957; //water density at boiling
 
  //Linear interpolate the water density
  return (_fAvgTemperature - 32.0) * (fDensityAt212 - fDensityAt32) / (212.0 - 32.0) + fDensityAt32;
}
#endif


jondecker76

  • Full Member
  • ***
  • Posts: 100
Re: Just finished my solar water heater 2 days ago... (Image heavy)
« Reply #30 on: May 22, 2011, 08:50:57 AM »
I have a question regarding BTU calculation, hopefully someone can answer.....

I use the well known formula of
BTU=temperatureRise * Gallons * WaterDensity

Now, of course, water density is different at different temperatures...  So which temperature should I use for calculating the water density?  The temperature of the water before the temperature rise, the temperature of the water after the temperature rise, or an average temperature between the two?

I'm currently averaging between the two, but I'm not 100% sure this is the correct way.  Any thoughts?

madlabs

  • Hero Member
  • *****
  • Posts: 686
  • Country: us
Re: Just finished my solar water heater 2 days ago... (Image heavy)
« Reply #31 on: May 22, 2011, 10:21:46 AM »
I had a solar heated hot tub for a couple of years. I'm going to set one up at my new place this summer. I have also helped two freinds get hydronic radiant floors going in their homes. Anyway...

I did a LOT of experiments with flow rate on my hot tub and found NO differnce. It seemed totally linear. More GPM meand more lower temp water. I'm sure there is some cut off point but it would be at the extremes. I spent a lot of time on it beacuse I felt there must be some sweet spot. However, all I ever found was that the larger pump cost me more electricity. With the floors it is a little different, too slow a pump causes a temperature gradient along the floor.

My $0.2

Jonathan

GaryGary

  • Sr. Member
  • ****
  • Posts: 411
    • Build-It-Solar
Re: Just finished my solar water heater 2 days ago... (Image heavy)
« Reply #32 on: May 22, 2011, 01:13:58 PM »
My return water from the collector goes into the top of the tank above the water in vapor space- this is so it does not create a vapor lock, and the collector can drain back.  I'm on the fence on whether or not there is really a difference with the stratification in the tank - I think in the end, whether it is stratified or not will not matter so much, and heat will still be picked up efficiently by my heat exchange coil. However, since I do have a solenoid operated "vent" at the collector, I could open it to allow drainback while piping my collector return water to the bottom of the tank.  I'm just not yet convinced that there will be much benefit...

Re: stratification - my 8 degrees is rather misleading... The pump inlet is an inverted U-tube which goes over the top of the tank (so that I would have no punctures in my EPDM liner - i considered bulkhead fittings but talked myself out if it).  Therefore, any water drawn from the bottom of the tank gets heated as it rises up the suction line through the hotter "layers" of water on its way up over the sidewall and to the pump... Taking this into account,  my stratification is probably similar to yours, and its a factor I didn't consider until now.  Oh how I wish I had put a temperature sensor under my liner to get an accurate bottom temperature! Another factor that I need to be patient for, is to see how much this dynamic changes once I get my tank to much higher temperatures!

My temperature sensors for the tank, the pump outlet, and the tank inlet from the collector - are all located at the tank, so the difference in temperature between the water coming into the tank from the collector, and leaving the tank to the collector are in places where any heat lost in transit is already accounted for.


My analog inputs to the arduino based controller are all taken up, but I think my plans moving forward should include taking away the ambient temperature reading in favor of putting a deep temperature probe in the bottom of the tank so I can more accurately measure stratification in the tank (it would be more valueable to me than the ambient reading I take now).

I think it may also be worth my time to pipe the pump return to the bottom of the tank, and connect the solenoid vent valve at the collector to my controller and use that for the purpose of eliminating vapor-lock and allowing the collector to drain back (though this introduces a new point of failure).


Regarding when to shut off the pump, I'm still leaning towards an "Average" tank temperature, even if your explanation that heat in > heat out= net gain seems correct from a logical point of view. For example, if the top of the tank reads 100 degrees, and the bottom reads 50 degrees,  you can say that the average tank temperature is 75 degrees...    My thought is that by putting water in the tank that is lower than the average temperature, will lower the average temperature.    I guess I need to sort this out and so some real world tests, but of course I'd love to hear multiple point of views on this!

Hi Jon,
Congratulations on your project -- it looks like its coming really well.

I'd recommend against moving your return to any place but the air bubble above the water in the tank.  The vacuum break type of gadgets that you would have to use if you went this way have a bad reputation, and if they fail in freezing weather you have a big repair job on your hands, or a pile of scrap copper.  To my way of thinking, the little bit you would gain would just not be worth it.  I think you are right to be a bit skeptical of the benefits of stratification.

When you take the coldest water out of the bottom of your tank and it heats up in the collector but is still cooler than the water in the top of your tank when it returns to the tank, you are still adding heat to the tank.  If you take water out at 90F and return it at 91F, you are adding heat.  The only negative of returning water to the top of the tank that is cooler than the top of the tank is that you are reducing stratification.   

It seems like on most of the $1K systems, that once the circulation pump starts the stratification pretty quickly disappears -- this is certainly true on both of my systems, and for most of the systems that people have sent descriptions in on.  So, you must have a return pipe geometry that for some reason is not stirring things up much -- is there anything special about it?

Great job!


Gary