Author Topic: Having fun (My first Motor Conversion)  (Read 8140 times)

0 Members and 1 Guest are viewing this topic.

racer

  • Newbie
  • *
  • Posts: 22
Having fun (My first Motor Conversion)
« on: June 01, 2008, 04:54:02 PM »
Well I have spent a long time in the studing mode and then finally took the plunge. Starting of with a 3/4 HP 220/380 3.4/2.0 1440 Rpm Motor.

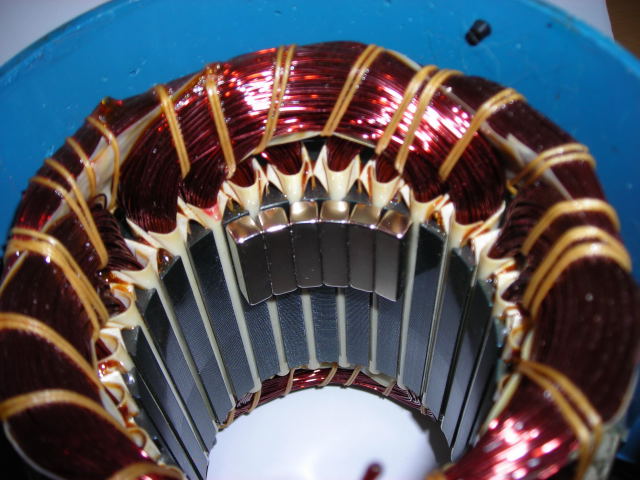
The first thing i did is set up the magnets in the stator to get the diameter of the rotor that I would have to make.


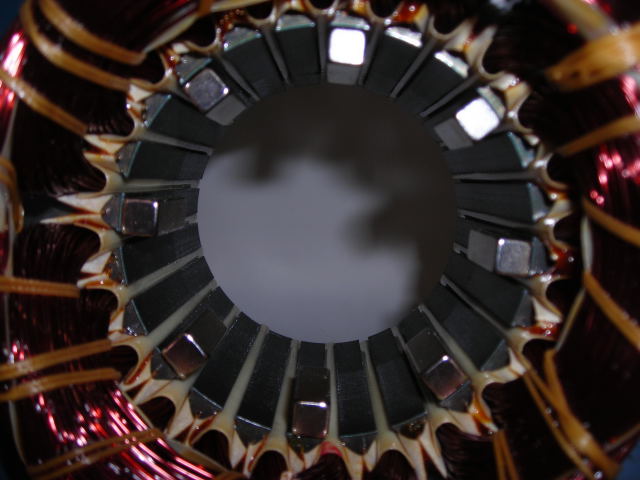
From info posted on this board from the late great Zubbly I then proceded to set up the magnets as they would need to be to cover the 5 of the stator legs (id of the coils) which worked out to be 6 magnets.


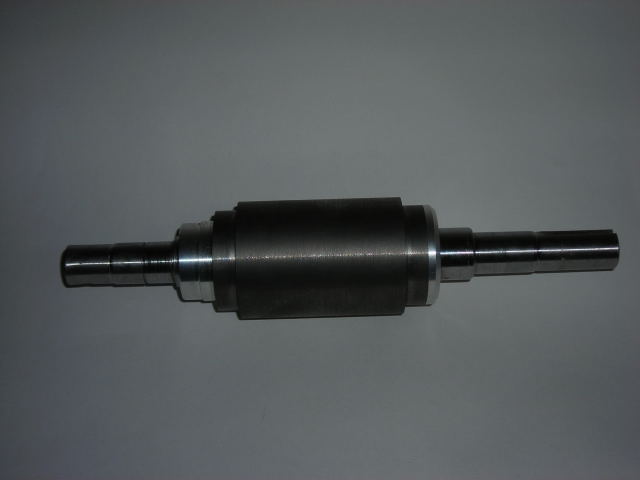
Then the real fun began. Making the rotor and putting the magnets on it.


The rotor is made of grey iron stock machined to allow aluminum end caps to be pressed into it and onto the stock motor shaft. I used loctite 638 for this task.


The magnets where placed on the rotor using Loctite 326. This took weeks as I placed each magnet on the rotor and gave curing time between each. In the beginning and end steps I was limited to only placing 1 magnet at a time but inbetween I was able to get 3 set at a time. I made a testing sleave with the proper I.D. to test clearances as I went along. Slowly step by step all 60 magnets found there rightfull place upon the rotor.


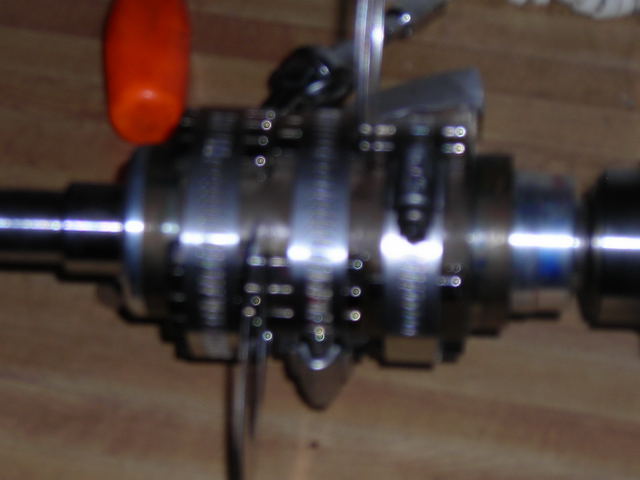
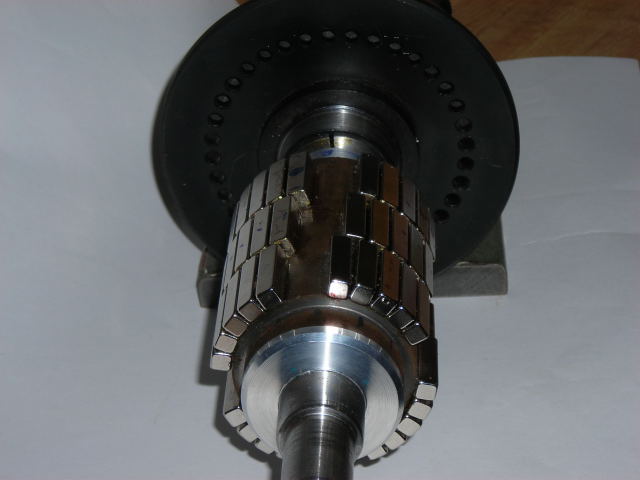
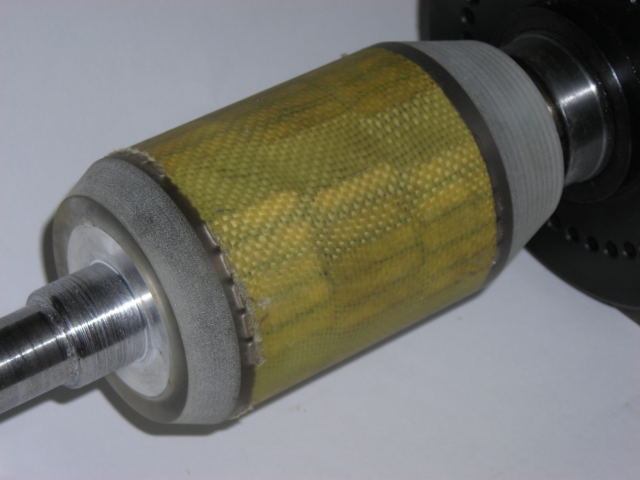
After all magnets where in place I laid up some Kevlar tape on the rotor and cast the unit with slow cure Epoxy resin. After casting I then cut down the O.D. to fit within the stator. In the end the magnet to stator gap is .047 of an inch and Rotor O.D. to stator is .012 of an inch.


Many thanks to Flux for pointing me in the right direction to test input watts properly. I already has spinning the motor in my little lathe between the chuck and the tailstock. I just added a arm to the base mounting point that has a point setting on a gram scale exactly 1 foot from the shaft center line. By getting the torque foot pound reading and rpm's from a laser tach I was able to calculate input wattage. Ft. Lbs x Rpm's/5252 x 746 = Watts

With the Amp meter and volt meters attached to the batteries I calculated output wattage.


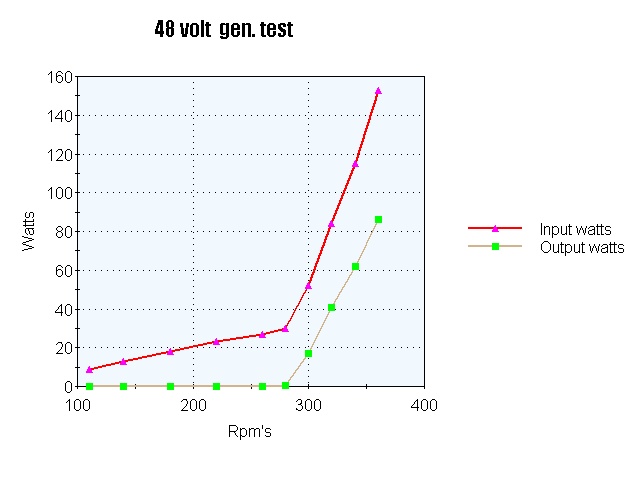
Even thought I don't have the power needed to pull this generator to max output on my lathe. I can now see that the output power of a stock wound motor is the


Claimed motor max amperage x battery clamping voltage x phases = max output wattage.


This goes along with what I have read on this board by others.


This means that my 3/4 conversion should make around 559.5 Watts.

Motor amps Delta 3.4 x 56v x 3 = 571.2

The max. wattage changes with battey charging state as far as i can see.

Watts per Hp 746 x .75 = 559.5


Zubbly rule of 150 watts per cubic inch of magnets.

Using 60 .25 x.25 x 1 inch magnets = 3.75 cu. in. x 150 = 562.5 watts. Means that I should be able to pull this to near max output.


The bad part is that my figures show this to be only 55% efficient which means that the prop will have to push out just over 1000 watts to drive the gen. to max output.


Some may ask about cogging. Yes there is some. It takes 10 ounces of force on the scale to overcome it. I have looked all over this board and have not found out if that is concidered allot or alittle.


I have ordered a set of blades of from ebay 6.8 ft TSR 8. By the Altons blade calculator my gen. should start at Tsr 9+ at 7.8 Mph and drop to 7+ at 24 Mph before needing to furl


Now onto the next steps furling system and tower.

« Last Edit: June 01, 2008, 04:54:02 PM by (unknown) »

Flux

  • Super Hero Member Plus
  • *******
  • Posts: 6275
Re: Having fun (My first Motor Conversion)
« Reply #1 on: June 01, 2008, 12:50:00 PM »
Nice work and nice data. Everyone else seems to measure output but ignore input.


Your data clearly shows iron loss below cut in and the efficiency on load.


With fast blades at tsr8 I think your iron loss will delay start up but once you get it spinning it should be ok. Looking good so far, I hope it works out.


Flux

« Last Edit: June 01, 2008, 12:50:00 PM by Flux »

ghurd

  • Super Hero Member Plus
  • *******
  • Posts: 8059
Re: Having fun (My first Motor Conversion)
« Reply #2 on: June 01, 2008, 09:53:09 PM »
"took weeks as I placed each magnet on the rotor"

Amazing you got them all on there!  

Nice.

G-
« Last Edit: June 01, 2008, 09:53:09 PM by ghurd »
www.ghurd.info<<<-----Information on my Controller

bob g

  • Hero Member
  • *****
  • Posts: 1107
  • 8.8kwatt idi diesel thermal conversion unit
    • microcogen.info
Re: Having fun (My first Motor Conversion)
« Reply #3 on: June 01, 2008, 11:48:28 PM »
if it isn't too much trouble :)


how many watts input power does it take just to turn the alternator at speed

with an open circuit stator?


i would expect the answer being X


therefore X= windage, friction, cogging, iron losses due to hysterysis, eddy currents in the laminations, but


neglecting copper losses.


your 55% figures pretty close to what i would expect from a pm machine of this design, and really is not bad in my opinion


bob g

« Last Edit: June 01, 2008, 11:48:28 PM by bob g »
research and development of a S195 changfa based trigenerator, modified
large frame automotive alternators for high output/high efficiency project X alternator for 24, 48 and higher voltages, and related cogen components.
www.microcogen.info and a SOMRAD member

SparWeb

  • Global Moderator
  • Super Hero Member Plus
  • *****
  • Posts: 5452
  • Country: ca
    • Wind Turbine Project Field Notes
Re: Having fun (My first Motor Conversion)
« Reply #4 on: June 02, 2008, 02:35:36 PM »
You're off to a great start.  I especially like the wrap of kevlar around the finished product.  You've obvioulsy heard of the rotor burst protection layers in turbofan engines.  I must agree: nice job packing the magnets on, too.


I see 5 concentric coil groups, and can extrapolate that the 6th is hidden under the cropped edge of the picture.  With a speed rating like 1440, then I guess it's a european 50Hz type, originally with 4 poles, and you conserved that geometry.


I'm seeing about 60% efficiency when I look at your chart at 360 RPM, when you have less than 90 watts.  Once you ask for 560 watts, then the loss will be higher.  There isn't much cure for this with a motor conversion; even after re-winding you have the iron swimming in magnetic fields to overcome.  You can see that in the input power required before getting to cut-in at 280 RPM.


Say you have 5 ohms resistance as you have it connected now.  To get 560 W output, at 48V, the current is about 12 Amps.  Using I^2*R, that requires at least 700W, and don't forget the iron, about 100W more.  So... 560W out and 1360W in, you have about 40% efficiency.  Don't worry, that's pretty good.


I'm still wallowing in 12 Volts, so I never get to see 50% efficiency.


Your TSR and wind speed estimate checks out too.  Might be a bit optimistic on the prop efficiency, but maybe you'll never notice, considering how finnicky wind can be.


Looks great!  Hope to see more soon.

« Last Edit: June 02, 2008, 02:35:36 PM by SparWeb »
No one believes the theory except the one who developed it. Everyone believes the experiment except the one who ran it.
System spec: 135w BP multicrystalline panels, Xantrex C40, DIY 10ft (3m) diameter wind turbine, Tri-Star TS60, 800AH x 24V AGM Battery, Xantrex SW4024
www.sparweb.ca

racer

  • Newbie
  • *
  • Posts: 22
Re: Having fun (My first Motor Conversion)
« Reply #5 on: June 02, 2008, 05:56:58 PM »
Bob G


The open circuit drag is estimated on two run ups. I believe cold bearing grease add drag to my first run up.


A)260=23.82 WATTS

B)300=28.29

C)340=32.65

D)380=37.51

E)420=42.00

F)460=46.52

G)500=50.99

H)540=55.61

I)580=60.14

J)620=64.11

K)660=68.15


« Last Edit: June 02, 2008, 05:56:58 PM by racer »